| Basic CVS Commands | |
|
To run a CVS command, you first select the files or folders the command is supposed to work with in the module window. Then you simply choose the proper menu item from the "Sandbox" or "Repository" menu. Some of the commands are also accessible via contextual menus in various windows of MacCVSClient. In some cases a dialog box will show up and you'll be able to enter options or additional parameters for the issued command. This document is not a complete list of all CVS commands. Instead, it describes special MacCVSClient features of some CVS commands. |
| Committing Files |
|
If you commit files, you probably want to enter precise and descriptive comments (Cederqvist: "log info") stating what you changed and for what reason.
When the "Sandbox/Commit" menu entry is selected, all or parts of the comments currently in the Scrapbook window can be automatically copied to the "Commit" dialog. Here you can apply last changes to them before really committing. Note that all the comments in the "Commit" dialog will apply to all files (or folders) currently selected. So, be sure to have selected only those files (or folders) that you want to commit with the current comments. In the Preferences dialog you can select your favourite auto-comment-copy behaviour.
|
| Collecting Comments and CVS Diff |
|
To be able to write proper comments for the commit, it's very useful to check the difference between the last committed version of your sources and the current version. To do that, you use the CVS diff command. In the module window, select all files that you are interested in (or simply select the module folder's entry; this is the topmost line in the module window's file/folder list) and choose menu item "Sandbox/Diff". You'll see the "CVS Diff" dialog. Make sure the check box "Full Context" is marked and press the OK button. Now a CVS diff command is run on the server and the diff output is sent back to MacCVSClient. Every file that has a difference will be marked with the letter delta near the left border in the module window. You can then check the difference information by double-clicking the file in question in the module window. Alternatively, you can select the file and press the RETURN key or choose menu item "Info/View Diff". Remember that a file's diff information is only available if the file is marked by the letter delta (which is the case after running a "Sandbox/Diff" on the file). If you run a "CVS Diff" command on a file and don't see a delta mark next to the file name in the module window, this can have various reasons:
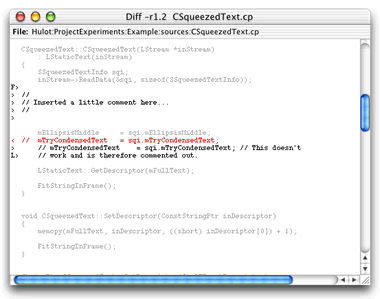
Let's now suppose you have diffed a text file and diff information is available. You get a diff window like the one below. |
 |
|
Here you see exactly where the changes were made. E.g. you can easily find out which functions or methods the changes were done in. Use the menu items "Info/Previous Diff" and "Info/Next Diff" to jump from diff line to diff line. Shortcut keys for this are: COMMAND-[ and COMMAND-]. There are two more search functions: "Info/Previous Full Line" and "Info/Next Full Line". With these (or their shortcuts SHIFT-COMMAND-[ and SHIFT-COMMAND-]) you can scroll up/down to the next text line that starts in the first text column. In a C source file this might be the head of a C function. If you work with indented paragraphs in HTML source, these functions get you to the beginning/end of the current paragraph. The diff window's contents is marked by colour and a prefix to make the differences easily recognizable.
The text in the diff window is mouse-drag-selectable. So, cut and paste between the diff window and the scrapbook window (or any other text window) works. That's how the scrapbook window is supposed to be worked with. Open the appropriate diff window, compose the commit comments, then select "Sandbox/Commit" and commit your commented changes. See also: Info Windows, Dynamic Menus. |
| Handling Conflicts |
|
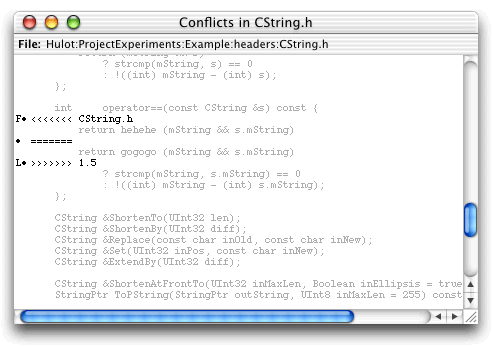
If CVS detects conflicts during a CVS update operation, MacCVSClient marks the affected files for you. These marks then will be stored in MacCVSClient's "CVS" files, so that even after quitting and restarting, confilct ridden files will still be recognized as such by MacCVSClient. Suppose you just ran a "Sandbox/Update" and got a merge conflict (which is indicated by a 'C' in the flags column of the sandbox window). Select the conflict ridden item in the sandbox' window and choose menu item "File/Check Conflict" (OPTION-double-click on the file or OPTION-RETURN do the same job) and a conflict window like the one below will appear. |
 |
|
Like in the diff window, you can jump from conflict to conflict using the "Info/Previous Conflict" and "Info/Next Conflict" menu entries (shortcuts: COMMAND-[ and COMMAND-]). The commands "Info/Previous Full Line" and "Info/Next Full Line" are available here as well. For an explanation, see Collecting Comments and CVS Diff above. The conflict window is READ ONLY, like the diff window. You cannot resolve the conflicts here. Supposedly, you'll be going to resolve any conflict you find in your files as soon as possible. You'll use your compiler's IDE or whatever editor to get things clean. Afterwards, you start MacCVSClient again (or switch back to it in the multifinder) and want to commit your clean sources now. To reset the conflict marks MacCVSClient has set you select the (previously) conflict ridden file and then simply choose menu entry "File/Check Conflict" again. The check conflict function then does several things:
So, if you have resolved all conflicts in a file, MacCVSClient will re-enable the "commit" command for the file in question. If you missed some conflicts, they will be shown in the conflicts window. Now suppose, you have got a file that contains one of those three tokens above that MacCVSClient interprets as conflict signs. But in your case they might not be conflict signs at all. They might be perfectly OK in your file and nly MacCVSClient complains and deprives you of committing (this should be a very rare case, I'd presume). In this case you can override MacCVSClient's opinion and force a reset of the conflict mark. To do that, you select the file and choose menu item "File/Reset Conflict". You then see a confirmation dialog and by pressing OK there, you reset the conflict mark. Be careful with this function. I recommend not to use it unless you have got the problem mentioned above, where MacCVSClient erroneously treats your conflict free files as conflict ridden. The reset conflict function only works on single file selections for safety reasons. See also: Info Windows. |
| Conflicts in RBL |
|
When RBL encoded resource files are merged by CVS, there can be conflicts, the same as in TEXT files. Some of these conflicts can be automatically resolved by MacCVSClient. You'll see messages in the console window if this happens. This automatic conflict resolution is safe! MacCVSClient does not base this resolution on guesses. Conflicts are only resolved automatically by MacCVSClient, if it can make clear decisions. If there are conflicts that cannot be resolved automatically like two people adding or changing the same resource independently, MacCVSClient leaves these conflicts in several files:
If there is an existing file in the way, new files are created by appending numbers to the new file names, e.g. "name-desc 1" instead of "name-desc". To resolve the collisions, you use the resource editor of your choice. You might have to use ResEdit or another low level resource editor because the file name-repo contains only the conflicts. That might not be enough data for e.g. Metrowerks Constructor to work on the file. After you have resolved the conflicts, you need to use the "File/Reset Conflict" command to reset the file's conflict flag. Conflicts in RBL encoded files can currently not be viewed in MacCVSClient. The "File/Check Conflict" command does not work with RBL encoded files. |
| Retrieving File Logs |
|
After running the CVS log command on files, the log output is stored in temporary files as long as the module is open. It can be viewed using the "Info/View Log" command. This command opens a window similar to diff and conflict windows which allows for browsing and searching. Log output is available for a file if it is marked by the ® sign. When receiving CVS log output from the server, MacCVSClient looks for the string "Working file:" (at the beginning of a line) to find out which file the log output belongs to. This mechanism is somewhat fragile for two reasons:
In both cases, MacCVSClient writes the log output it can't find a file for to the console window. In everyday's work, log output parsing works quite good and normally all logs go where they are supposed to go. You can specify in the Preferences that log output is also echoed to the console window. Then the log information shows up in both places: log and console window. See also: Info Windows, Dynamic Menus. |
| Retrieving Old Revisions |
|
If you want to check out an old revision of a file in CVS, you can do that in two ways. One is to update that file and specify the proper revision or date. In this case the file will be marked with a sticky tag or date. It will subsequently be excluded from updates until the sticky tag or date is explicitly reset. Furthermore, an existing version of the file in your working directory would be overwritten by this newly checked out old revision. If you want to have it that way, fine! But what if you just want to have a copy of that old revision handy and still want to keep your checked out (or even already modified) revision of the file? MacCVSClient has a special command to retrieve old revisions of files: "Sandbox/Retrieve". When retrieving, the revision number is appended to the retrieved file's name. See also: Dynamic Menus. |
| Rev. 1.45 | Legal — Copyright © 1997-1998 Fontworks Ltd., © 2002-2003 Jörg Bullmann |